The Lands department has recently upgraded its online Mapping Service system, significantly increasing the availability of products and services. Previously useful access to many of these products required a trip to the Mapping and Survey office in North Point or elsewhere. . I have summarised a few of the most useful parts of the new service to people researching Hong Kong History below.
The HK Mapping service website can be reached here
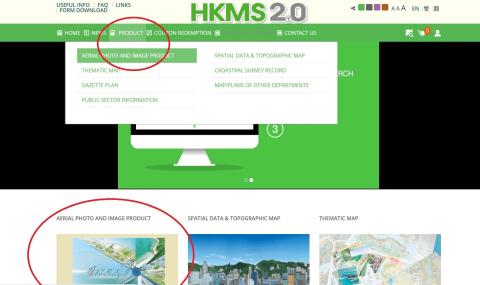
To begin accessing everything either move the mouse over the Product Category on the green bar towards the top of the page and select Aerial Photo and Image Product, or click on the Aerial Photo and Imagery Box further down the title page.
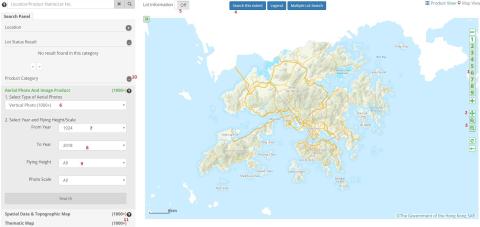
This will load the main map screen. Loading can take a couple of minutes and everything will become unresponsive at times so be patient. All the other options on the main page can be accessed through this map but first we will access the online aerial photograph selection:
Key: 1:- Zoom Level. 2:- Pan Button 3:- Zoom in/out button. 4:- Only Search map area displayed on screen. 5:-Turn interactive lot map on/off. 6:-Type of Aerial Photo (Vertical/Oblique) 7:- Start year of photo search. 8:-end year of photo search 9:-flying height of plane taking photo. 10:- minimise product category.
Anyone how has used the terminals in the Mapping Office in North Point will be familiar with the way the map operates. The most important point to note is that it is best to zoom to the area you would like a picture of before searching otherwise you will get thousands of results. To zoom you can either click on the numbers labelled 1 on the right hand side of the map (The higher the number the greater the zoom) or click on the magnifying glass labelled 3 and click on the point on the map you want to zoom to. It is also possible to click and hold then draw a box on the map around the area you want to zoom to. Note that for the zoom in out function to work y clicking on the map one of the buttons labelled 3 must be selected. The default is button 2 which allows you to move the map in any direction required once you have zoomed in. The scroll wheel on the mouse can also be used to zoom in/out
For the tutorial we will examine Kowloon Park - the former site of Whitfield Barracks. Once zoomed into the correct location and BEFORE searching click the button “Search this Extent” labelled 4 at the top of the page. This will limit the search to just the area displayed on screen. We will examine vertical photos (6) and look at the years 1924 (the earliest aerial photos available) to 1963.
You should get a screen that looks something like this:
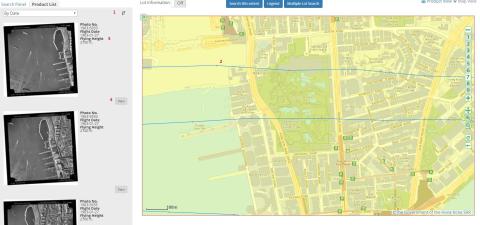
The search returned 41 results (your number may vary depending on exactly where you zoomed the map to.) The results are displayed down the left hand side of the map, 10 to a page. You and either use the mouse scroll wheel or the bar on the right hand side of the page to navigate through them. The default sorting is by date, newest first but I prefer to use the button labelled 1 to change it to oldest first. If you hover the mouse over each photo a green square will appear on the map to show exactly what area the photo covers. Feel free to zoom the map out as the results will not change until you click search.
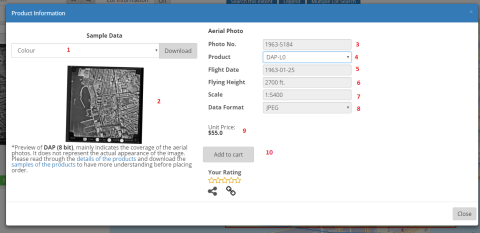
On the map a series of lines are displayed, with dots every so often like the one labelled 2. The lines are the flight path of the plane taking the aerial photo with each dot representing one photo. It is possible to access the photo you want by clicking on the dot which saves you having to find the picture you want in the list on the left hand side. Once you have clicked the dot, click the magnifying glass on the pop up screen that appears which will remove all the listing but the selected one on the left hand side of the screen. Then click the ‘View’’ button, labelled 4 in the above photo. Another pop up screen will appear like the one below:
Sample data, labelled 1 gives you a sample of the different quality products available. It has nothing to do with the area we are looking at, it is the same four pictures throughout the site whose job is only to show the difference in quality. Try it once then ignore it. Label 2 is a preview of the photo you will be purchasing. Labels 3-8 Tell you about the photo. Label 9 is the cost of the photo and 10 is how to add it to your cart. 4 is the most important as this impacts the quality of the photo. I would recommend always using DAB-Lo as the quality is good enough for most research purposes. DAB is the highest quality available, however it costs more. The above photo cost HK$55 in DAB-Lo and HK$695 as a DAB. There are also paper copies available whose cost depends on the size & quality but for most research purposes DAB-Lo would be fine.
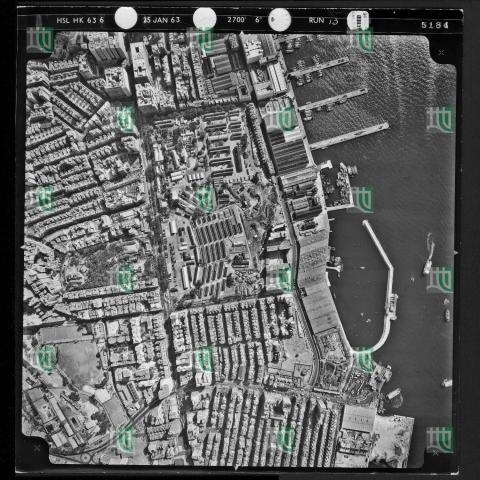
Most people will not want to pay HK$55 per photo so for research purposes ONLY a great option is to click on the picture at label 2. A new tab will open and a much larger image will appear (loading times can be minutes) Below is the image that you would get for the above example. (South is top)
The quality on the image (which is watermarked by the Mapping office) is good enough for most research purposes and there is no problems accessing it for your own personal research. Remember that these are copyrighted so do not redistribute them anywhere without permission.
The above covers how to use the basics of the system, but as you will quickly find there are thousands of aerial photos so which ones are the best. I have summarized a few of my favourites below:
1924 - Quality is poor, they are overexposed however as the earliest aerial photos of Hong Kong they are extremely useful. The NCAP recently rescanned these pictures but unfortunately the quality did not improve much. I am unsure if the Mapping office has the new versions
November 1945 - Quality is not great but better than 1924. A great resource for examining buildings that were destroyed during WW2 as nothing has been rebuilt yet
1949: -The first decent quality aerials of Hong Kong. A great series
1963- The first aerials produced by the Hong Kong government (all previous years were done by the military) This is also the earliest year that you can buy electronic copies online. Older series are paper only and I believe you must pick them up in person in North point -no postage available.
After 1963 there are many different series available, with some years being better than others.
The oblique photo option should also be utilized. These are pictures that are non vertical -taken at an angle. They were mainly taken after 1972.
One option I did not mention was the ability to access an interactive lot map. On the map in the second photo above, changing the button labelled 5 to ON will cause a complete zoomable Lot map of the entire of Hong Kong to appear over the existing map. The data can sometimes overwhelm the map and a refresh may be necessary.
I hope the above was helpful. In part 2 I will cover some of the other useful products available through the portal
Part 2
Coming soon.
Updates for 2020
The HKMS website has changed since Herostratus wrote the helpful tutorial above. So where he writes:
The most important point to note is that it is best to zoom to the area you would like a picture of before searching otherwise you will get thousands of results. [...]
For the tutorial we will examine Kowloon Park - the former site of Whitfield Barracks. Once zoomed into the correct location and BEFORE searching click the button “Search this Extent” labelled 4 at the top of the page. This will limit the search to just the area displayed on screen.
The new steps (as of June 2020) are:
Tutorials
David, would it be possible to put the tutorials and their updates into a dedicated section where they can easily be found?
re: Tutorials
Currently the biggest collection of tutorials is on the FAQs page: https://gwulo.com/node/4713
I've added an "Other useful tutorials" page there: https://gwulo.com/node/50208 Please add a comment to that page if you want to let readers know about any other useful tutorials.