In this week's guest post, long time Gwulo contributor gw shares what he's found out about the naval minefields laid in Hong Kong waters prior to the Battle of Hong Kong.
The Map
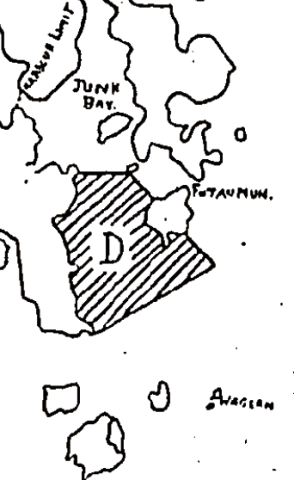
I stumbled across this map of Hong Kong’s WWII naval minefields whilst looking for something else in an old newspaper.
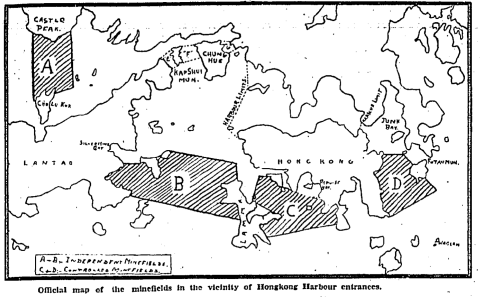
The map shows minefields blocking all four approaches to Victoria Harbour, namely:
- Area ‘A”, the North Lantau Minefield (NLM) between Lantau and the New Territories.
- Area ‘B’, the West Lamma Minefield (WLM) between Lamma and Lantau.
- Area ‘C’, the East Lamma Minefield (ELM) between Lamma and Hong Kong Island.
- Area ‘D’, the Tathong Channel Minefield (TCM) between Hong Kong Island and the Clearwater Bay Peninsula.
Three other areas, “E”, “F” and “G”, covering the Kap Shui Mun narrows, are also labelled. The newspaper article accompanying the map explained that these areas were not mined, but access was banned during the hours of darkness.
The minefields had been laid following the 3rd September 1939 outbreak of war between Britain and Germany. The following paragraphs cover their development until the Japanese invasion of December 1941.
The Hong Kong Royal Naval Volunteer Reserve (HKRNVR)
The HKRNVR shouldered primary responsibility for mine warfare in Hong Kong [1]. Mobilized in September 1939, their duties included;
- Minelaying.
- Maintaining the minefields, including recovering mines that had broken free from their moorings and ensuring buoys marking the borders of minefields were correctly located with functioning lights.
- Patrolling to look for enemy shipping, ensuring minefield regulations were obeyed and taking enforcement action if necessary.
- Minesweeping for enemy mines.
“Independent” and “Controlled” Minefields
The map key mentions two types of minefield, “independent” and “controlled”.
“Independent” mines were anchored to the seabed, contained 350 pounds of TNT, and were of the “contact” type that explode upon physical contact of one of their protruding “horns” with a hard surface [2]. An “independent” mine is therefore indiscriminate, exploding against friend, foe or neutral object alike.
“Controlled” mines were connected by electric circuits to on-shore control centers from where they could be detonated by the flick of a switch if there was reason to believe that an enemy vessel was in the minefield. Conversely, vessels identified as “friendly” were allowed to sail safely through “controlled” minefields.
The question of how best to arrange the minefields was a tricky one. Preventing enemy vessels, both surface and submarine, from entering Victoria Harbour could have been achieved with relative ease by laying “independent” minefields across all four approaches, but this was impractical as friendly shipping would also have been unable to enter or leave. A strategy was needed that allowed the Harbour to be used as normally as possible by friendly shipping whilst delivering a high level of protection against enemy vessels attempting to enter.
The scheme finally adopted was a clever balance of “independent” and “controlled” minefields. Utilizing “independent” minefields as permanent, impenetrable barriers across the North Lantau and West Lamma Channels, surface vessels and submarines were forced to use either the East Lamma or Tathong Channels. Here they could be identified as friend or foe, with the former allowed to proceed and the latter destroyed by “controlled” mines, Royal Navy ships or coastal artillery.
The plan had the additional benefits of allowing Harbour access from both the west and east, as well as providing minefield coverage for many of the beaches seen as potential enemy landing grounds.
North Lantau Minefield (NLM)
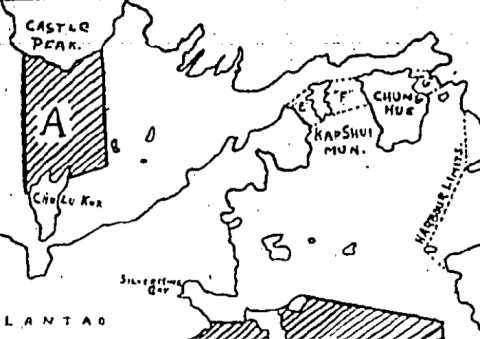
This “independent” or “contact” minefield covered the North Lantau Channel between Castle Peak, on the south-west coast of the New Territories, and the northern tip of Chu Lu Kok Island (Chek Lap Kok, the site of Hong Kong Airport). Also labelled are “Chung Hue” (now known as Tsing Yi), the Kap Shui Mun narrows, Silvermine Bay and the western “Harbour Limits” of Victoria Harbour.
The newspaper article accompanying the map explained that the limits of the NLM, and the WLM, were “marked by flag and light buoys", but rather worryingly went on to say that, “no reliance can be placed on finding buoys in position”!
Along with the West Lamma Minefield (WLM), the NLM became operational on 24th October 1939 with the announcement that “dangerous obstructions”, an understatement if ever there was, would be laid [3]. Initially two miles in length, it was extended to 3 miles in January 1941 [4].
The reason for choosing not to position the NLM in the narrowest part of the North Lantau Channel, the Kap Shui Mun area, is not obvious to me. Choosing Kap Shui Mun would certainly have reduced the size of the area to be mined, and thus require fewer mines and reduced maintenance. However, this assumes the absence of complicating factors that may have existed but of which I am unaware, e.g. perhaps there were stronger currents in the narrows.
Other factors considered may have included the advantage of minefield coverage of the potential landing grounds on the south-west New Territories beaches, and the benefit of small vessels being able to use the unmined channel between Chu Lu Kok and Lantau to bypass the NLM.
The NLM claimed its first innocent victims within one week of becoming operational. On 30th October 1939 approximately forty persons were killed when three ships were blown up.
On route from Canton to Hong Kong, the steam launch “Kwong Hong” was towing lighters “Tai Yee” and “Tai Hing” when intercepted by the Water Police in the Urmston Road off the New Territories west coast. Advised by the Police to by-pass the NLM via the unmined Chu Lu Kok Channel, “Kwong Hong” sailed south along the recommended course until coming to a Red Flag Buoy. Misunderstanding this to mean they were clear of the minefield, they changed course to sail east, passed north of Chu Lu Kok and so inadvertently and fatally entered the minefield [5].
A few days after this tragedy the authorities published a supplementary Notice To Mariners emphasizing the need to take the safe route through the Chu Lu Kok Channel [6]. Except for six weeks from 24th June to 7th August 1940, the Chu Lu Kok Channel remained open to small vessels until the Japanese invasion [7]. Being narrow and only 3 fathoms deep, the authorities were apparently satisfied there was negligible risk of it being used by the enemy.
Unfortunately, the “Kwong Hong” tragedy was not the only one to occur in the NLM. At approximately 6 p.m. on 12th April 1940 a junk struck a mine off Castle Peak and was destroyed. Four people were killed [8].
Incredibly, these fatal accidents failed to deter other small vessels, mainly junks, from entering the NLM. The newspapers frequently reported incidents of boats sailing through, and even anchoring and fishing in the minefield!
One of the more serious incursions occurred on 30th September 1940 when a fleet of twelve trading junks and passenger sampans narrowly escaped disaster when they sailed into the NLM in a rush to reach shelter after learning that the typhoon signal had been raised. Some were said to have avoided mines by inches. Intercepted by the authorities, the masters of each vessel were convicted of “Entering a Prohibited Area” and fined $30HK each or 30 days imprisonment with hard labour in default [9].
“Independent” mines breaking free of their moorings to drift freely wherever the currents took them was another huge problem that the naval authorities never overcame. As early as December 1939 mariners were “warned at all times to keep a sharp lookout for floating and drifting mines” [10]. On 21st May 1940 a stray mine exploded off Shap Long, the eastern extremity of Lantau, with a second mine washed ashore at Kap Shui Mun [11]. Another general warning about mines drifting throughout Hong Kong waters, including Victoria Harbour, was issued in July 1940 [12].
The problem persisted into 1941 with five persons killed in February when their junk was destroyed by a mine whilst fishing off “Long Kau Tang Village…about 2 miles from the nearest line of mines in the Lantau minefield”. According to naval reports January 1941 saw three mines adrift from the NLM, increasing to four in February, eight in April, eleven in May, fourteen in June and fifteen in September [13].
Rough seas exacerbated the problem. On 1st July 1941 high winds caused numerous mines to break free of their moorings, including three which exploded - at Capsuimun Pass (Kap Shui Mun), Telegraph Bay (Cyber Port today) and Lamma. An additional twelve mines washed ashore at various places without detonating and other drifting mines were dealt with at sea [14].
West Lamma Minefield (WLM)
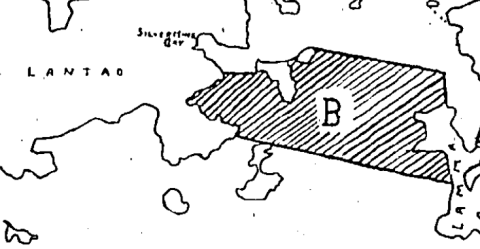
This “independent” or “contact” minefield ran from the north-west coast of Lamma, via the northern tip of Cheung Chau to the east coast of Lantau.
Although the WLM became operational on 24th October 1939 [15], all vessels had been prohibited from using the West Lamma Channel since 5th September 1939 [16]. Consequently, the ferry from Cheung Chau to Central was rerouted around the south coast of Lamma into the East Lamma Channel, an unpopular decision with passengers as it made the journey longer and rougher [17].
Cheung Chau was plagued by mines breaking away from the nearby WLM, drifting ashore and exploding. An early example was on Boxing Day 1939 when two stray mines caused minor damage to the Police Station [18].
On 3rd March 1940 another three mines were said to have “startled” and “unnerved” Cheung Chau residents. The first exploded on rocks below House No. 11, scattering shrapnel and rock far and wide - “pieces of shrapnel were found by people throughout yesterday a good distance inland…shrapnel was found on rooftops…in one house a large piece of shrapnel entered the bedroom”, but no injuries or serious damage was reported [19].
Laura Darnell, nee Ziegler, has posted the following two photos of shrapnel collected by her siblings after a huge mine explosion on Cheung Chau circa 1940.

")
Given the unusually wide scattering of shrapnel reported after the 3rd March 1940 blast, there’s a good chance that Laura’s photos capture the aftermath of that day’s events.
On another occasion in 1940 or 41 the Ziegler children came across an unexploded mine washed up on a Cheung Chau beach. Incredibly, having rolled it ashore, played with it and dismantled it – they lived to tell the tale!


I’m not an expert on mine identification, but I can’t see any “horns” on the mine in the photos, which leads me to wonder if it was a “controlled”, rather than “independent”, mine? As the “independent” WLM was the closest to Cheung Chau, the vast majority of mines beached on Cheung Chau would have been “independent”, but could a stray “controlled” mine from the ELM have floated around Lamma and washed up on Cheung Chau? If so, it may explain why it didn’t detonate upon coming ashore and being manhandled by the Zieglers.
Other Cheung Chau residents were reported to be alarmed by the frequency with which drifting mines were exploding on their shores and concerned that the situation would deteriorate further during typhoons. Some residents were not using the ferry to Hong Kong due to the fear of striking stray mines [20]. Their nerves were further tested between 22nd and 24th March 1940 when nine rogue mines exploded on the island [21], followed on 30th May 1940 by a mine drifting ashore about 500 yards from Cheung Chau Hospital [22], all without causing damage or injury.
Numerous newspaper reports of junks entering the WLM suggest that the local maritime community did not regard it as a particularly risky act. Perhaps the largest incursion took place on 22nd June 1941 when, “what appeared to be a whole fleet of fishing vessels” was found in the WLM. Miraculously there were no explosions. 23 persons were arrested [23].
There were numerous other reports of small vessels flouting minefield laws. If intercepted by the authorities, the master could expect to be arrested for unlawfully entering, anchoring or fishing in a minefield. Upon conviction they were normally fined between $10 and $30 with a short period of imprisonment to be served in default of payment [24].
Given the high number of stray mines from the WLM, and the general disregard for minefield safety, another serious accident was waiting to happen, and on 7th July 1941 it did. Over 30 persons died when three junks loaded with petrol entered the WLM between Shek Ling and Tai Ku Chan (Hei Ling Chau today), struck a mine and were destroyed [25].
East Lamma Minefield (ELM)
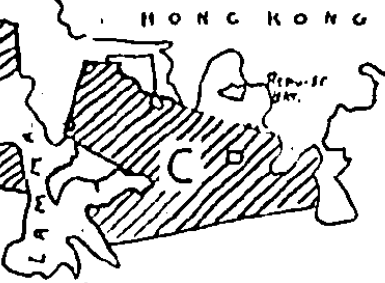
This “controlled” minefield stretched from Lamma’s east coast to Ap Lei Chau and covered the potential beach landing grounds on the south coast of Hong Kong Island, curiously excluding Tai Tam Bay. The ELM became operational on 3rd February 1940, the last of the minefields to do so [26].
Being a “controlled” minefield, the ELM could be crossed safely by “friendly” shipping if done in compliance with signals hoisted at the “Port War Signals Stations” situated at Mount Davis and Bluff Point, Taitam Peninsula. Three red balls hoisted during daylight, or three red lights at night, meant that the port was “closed” and entering the minefield was prohibited.
When the port was “open”, departing vessels were required to sail close to Shektongtsui Point, on the west side of Mount Davis, to allow for their identification by the Port War Signals Station and the “Detaining Battery”. Similarly, arriving vessels were required to be identified by the Bluff Head Station before entering the East Lamma Channel.
Notice to Mariners 24/1940 [27] gave details of how “small craft constructed of iron and steel, or wooden craft loaded with iron and steel” could safely cross the ELM. This focus on iron and steel indicates that the ELM utilized technology relying upon electromagnetic induction – the creation of an electric pulse in a circuit when a magnet moves nearby.
All vessels made, or carrying significant amounts, of iron or steel are natural magnets. By laying a wire circuit on the seabed and monitoring it for electric current, the passage of such vessels above the wire can be detected. This technology was utilized in naval defence by two devices, namely “guard loops” and “indicator loops”.
A “guard loop” was a wire circuit laid closely around a string of “controlled” mines. The generation of an electric pulse in a “guard loop” indicated that a vessel made of, or carrying, iron or steel was crossing the minefield. If it was an enemy vessel the “controlled” mines could be detonated with maximum effect. The mines of the ELM could be detonated from “Mine Control Station, Lamma”, at Chung Hom Kok [28].
“Indicator loops” were wire circuits normally laid across the approaches to a port to give an early warning of approaching vessels. As the excellent website “Indicator Loops” [29] studies them comprehensively, including a detailed page on Hong Kong, I will not go into further detail about them here.
“Controlled” minefields were not new, having been deployed during WWI and credited with sinking the German submarine UB116 inside the British anchorage at Scapa Flow on 28th October 1918 [30]. Technological development had continued during the inter-war years leading to claims that, “thanks to certain devices the control system is so perfect that no enemy ship passing over a controlled minefield, even in darkness or fog, could possibly escape destruction” [31]. Details of these “new devices” were not specified as they were classified as “secret”, but “guard” and “indicator loops”, along with hydrophones, were probably being referred to.
Despite this early optimism, events in Sydney Harbour on 31st May 1942 showed that practical problems could still arise. Three Japanese mini-submarines attempted to enter Sydney Harbour. One was caught in an Anti-Submarine Net, but the other two successfully infiltrated the inner harbour. One allied ship was torpedoed with the loss of 21 seamen. Minefields were not part of the Sydney defences, but “indicator loops” were laid across the approaches.
A review found that the outer “indicator loops” had not been working, and that the “inner loops recorded such small readings, commensurate with the size of the subs, that they were not noticed among the readings generated by the usual traffic on the harbour” [32].
Notwithstanding human error, if a monitor noticed an electric pulse in a “guard loop”, the following steps would immediately be taken leading to the decision of whether to detonate “controlled” mines.
In good visibility, an observer would look to see if the vessel responsible for generating the pulse was a surface vessel, and if so, was it friend or foe? If friendly, it would be allowed to pass. If foe, the nearest “controlled” mines could be fired.
If no surface vessel was present, two assumptions could be made. Firstly, that the electric pulse must have been induced by a submarine. Secondly, that it must be an enemy submarine as all allied submarines entered and left harbour on the surface. Again, the “controlled” mines could be detonated.
During poor visibility due to darkness or bad weather, visual observation was impossible and the “Port Closed” signals would be hoisted. Any pulse in the “guard loops” could then be assumed to have been generated be an enemy vessel, either surface or submarine, and the “controlled” mines detonated.
An exception to the “Port Closed” rule allowed ships to obtain “special permission” to pass through the “controlled” minefields when the Port was closed. For example, departing river steamers could obtain “special permission from the Extended Defence Officer, through the Detaining Officer” [33]. Staff monitoring the loops would be informed of the expected time of passage of a vessel granted “special permission” and allow it to pass unhindered.
The ELM was not augmented by an Anti-Submarine Boom (ASB), unlike the TCM. Detection of a submerged enemy submarine attempting to enter Victoria Harbour via the East Lamma Channel was therefore heavily reliant upon the “indicator” and “guard loops”. I can’t explain why an ASB was considered necessary to compliment the TCM, but not the ELM – ideas anyone?
As “controlled” mines were designed to detonate only upon receipt of an electronic signal from their control centre, they were far less of a risk than “contact” mines to friendly shipping negligently entering the minefield. The only reported sinking in a “controlled” minefield that I know of occurred in the ELM on 23rd July 1940. Between five and ten people were killed when Junk No.5012 struck a mine [34]. Unfortunately, press coverage gave few details. Whether the incident involved a deliberately detonated or malfunctioning “controlled mine”, or whether a stray “contact mine” had floated into the ELM, was not mentioned.
Tathong Channel Minefield (TCM) & Anti-submarine Boom (ASB)
This “controlled” minefield, together with an Anti-Submarine Boom (ASB), protected the only eastern approach to Victoria Harbour – the Tathong Channel, between the east coast of Hong Kong Island and the Clear Water Bay Peninsula.
The map marks the eastern “Harbour Limit” of Victoria Harbour and “Junk Bay” (today largely reclaimed as Tseung Kwan O). The label “Fu Tau Mun”, at the southern tip of the Clearwater Bay Peninsula, may be a spelling mistake as various maps of the era label it “Fo Tau Mun” or “Fat Tau Mun”.
Installation of the Anti-Submarine Boom (ASB), a floating cable with suspended net to catch enemy submarines, preceded the TCM. A possible indication that the ASB was being installed before the outbreak of war was the 24th August 1939 announcement that “the western side of Tathong Channel is obstructed off Cape Collinson” [35]. The nature of this obstruction was not specified, but its location was exactly where the ASB would soon appear.
The ASB became operational on 7th September 1939 when all ships using Tathong Channel were required to pass between two “Gate vessels” and became subject to inspection “outside the boom” by an “Examination Launch” [36].
The video at https://www.britishpathe.com/video/VLVA8Q2FTA49EA31E9GWQ4UEBXAJH-BRITAI… footage of the ASB in action on 14th March 1940:
- 00:42 to 00:44 shows Cape Collinson Lighthouse with the ASB below.
- 00:44 to 00:48 is a close-up of the two “gate vessels”, anchored and joined at the stern by a string of buoys - “the gate” in the closed position.
- 00:48 to 00:54 shows a surfaced submarine sailing between the two “gate vessels”. The string of buoys that had earlier connected them now stretches out behind the smaller ship - the “gate” is open.
The excellent Hong Kong War Diary website [37] lists three ships as being associated with “booms”, namely, “Boom Service Vessel” HMS Barlight, and “Boom Gate Vessels” HMS Aldgate and HMS Watergate (a most appropriate name for a Boom Gate Vessel). Unfortunately, I can’t find photos of any of them.
However, HMS Barlight was a “Bar Class” ship, another of which was HMS Barlow [38], pictured below.
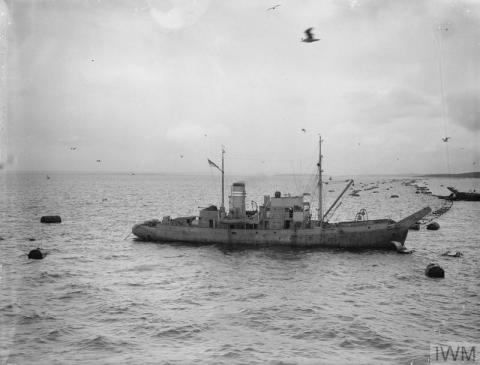
As the largest ship in the video looks like HMS Barlow, and presuming ships of the same Class are similar in appearance, I’ll say she was probably HMS Barlight.
HMS’s Aldgate and Watergate were both Moorgate Class vessels [39]. So was HMS Bishopsgate, pictured at www.nqht.org/29-cruickshanks/ , and looks very similar to the small ship in the video. Again presuming all vessels of the same Class shared a similar appearance, I’d say the smaller of the two ships in the video was either HMS Aldgate or HMS Watergate. Corrections welcome. Both Aldgate and Watergate, together with Barlight, were eventually scuttled by their crews during the Battle of Hong Kong to prevent their use by the Japanese [40].
On 20th November 1939, two and a half months after the ASB had become operational, so did the TCM [41]. Positioned between the east coast of Hong Kong Island and the islands of Tung Lung Chau and Tit Cham Chau (also known as Slope Island and Jan Chau) off the Clear Water Bay Peninsula, it was not at the narrowest part of its channel, Lyemun Gap. The wish to protect the potential landing grounds at Shek O and Big Wave Bay beaches may have been a factor in this decision.
Mines of the TCM could be detonated from “Mine Control Station, Tathong” in Shek O [42]. Being a “controlled” minefield, “friendly” vessels were permitted to sail through it when the port was “open”. The hoisting of three red balls during daylight, or three red lights during darkness, at the Port War Signal Station, Cape D’Aguilar signalled that it was “closed” [43].
Realizing that Fo (or Fat) Tau Mun Pass, labelled Fu Tau Mun on the map, provided a route around the TCM and the ASB, the authorities announced its closure to all shipping from 1st December 1939 [44] and later blocked it with “obstructions of a non-explosive nature to a depth of 2’6” [45].
By 30th December 1939 a second gate in the ASB, known as the “Junk entrance”, had been established [46]. On 22nd June 1940 the ASB was repositioned to stretch from near Kei Pi Ha Point, Little Sai Wan Bay to Futau Chau (Junk Island) with small craft told to use “the gap at the southwest end of the boom close off Kei Pi Ha Point” [47].
Late Additions and Invasion
On 2nd December 1941 it was announced that a boom was being laid “about 300 to 500 yards off the north shore of Hong Kong extending from Green Island to the Naval Dockyard”, with all craft approaching the shore required to pass through one of two gaps off the Star Ferry and China Merchants Piers [48]. According to one source the original plan had been for the boom to “protect the whole length of the northern shore of the Island”, but it was completed only from Green Island to about the Western Market as the boom laying crews deserted [49]. If so, this was most unfortunate as the eastern part of the harbour, where the landing eventually took place, was left uncovered.
Around the start of the 8th December 1941 invasion saw a rush to strengthen some existing minefields and mine additional areas [50], e.g.:
- A line of mines was laid from Hong Kong Island to Ping Chau via Green Island and Kau I Chau. Date unclear.
- On 7th December 1941 the entrance to Port Shelter, Sai Kung, New Territories was mined.
- On 9th and 10th December 1941 mines were laid at Kap Shui Mun.
The invasion route chosen by the Japanese was overland through the New Territories and Kowloon, then across the eastern part of Victoria Harbour to Hong Kong Island - thereby avoiding all the minefields and booms.
On 19th December 1941, after the Japanese landing on Hong Kong Island, the “controlled” minefields, “indicator loops” and Mine Control Stations Lamma and Tathong were destroyed by the defenders to prevent them falling into enemy hands. As the “independent” minefields could not be destroyed as easily, they were taken over by the Japanese and remained in place until after Hong Kong’s 1945 liberation [51], [52], [53].
What Remains Today?
I don’t know exactly where the Mount Davis Port War Signals Station was located. However, at https://gwulo.com/media/25044 Freddie posted a pic of a ruin on Mount Davis and described it as being, “near the back of the two storey Port War Signal Station”. The only two-storey building that I know of in that vicinity is pictured below – but I’d previously assumed it was part of the nearby No.1 Gun position of Mount Davis Battery.
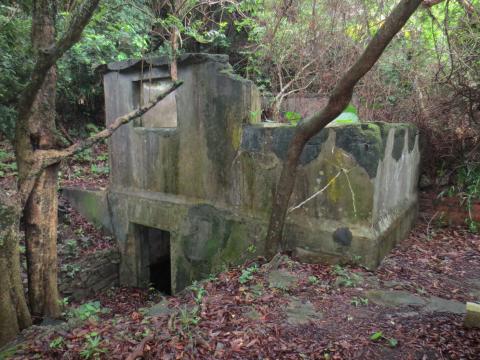
Freddie if you are reading this, or anyone else who knows the answer, is this the Mount Davis Port War Signal Station?
Other buildings associated with the minefields included the Port War Signal Stations at Bluff Head and Cape D’Aguilar, and the Mine Control Stations at Chung Hom Kok and Shek O. Does anyone know their exact locations and if they still survive?
This old metal structure lies in the water near Waterfall Bay at the narrowest part of the East Lamma Channel.

Its lowest section is partly submerged and appears to be a heavy metal frame supporting 14 thick cables running ashore from the sea. Embedded in the rocks above are two, parallel, rows of metal rods to which the cables were probably once attached (for more details see https://gwulo.com/node/25902).
Despite it being years since I first came across it, I still don’t know what it is. Suggestions have included electricity cables running across the East Lamma Channel or a pier associated with the old Dairy Farm cableway nearby. My gut feeling is that it was the landing point for cables of the ELM “guard loops” or strings of “controlled” mines. If so, it’s the only remaining relic of the actual minefields that I’m aware of, but in the absence of proof its identity will remain a mystery.
Conclusion
I am not aware of any enemy vessel being sunk or damaged in the Hong Kong minefields, but this does not necessarily mean they were ineffective. On the contrary, minefields are primarily defensive weapons that aim to prevent the enemy from using mined routes. By this measure the minefields were highly effective as the Japanese failed, or more accurately did not attempt, to cross them.
However, the Japanese decision to invade overland was probably not solely because of the presence of the minefields, but due to a combination of other reasons. Firstly, the ease of an overland invasion from Shenzhen into the New Territories compared to an amphibious landing. Secondly, the need for as many ships as possible to be deployed in the simultaneous attacks on Pearl Harbour, The Philippines, Thailand and Malaya. Thirdly, recognition of the danger posed to their shipping by Hong Kong’s artillery batteries, particularly the 9.2 inch guns which had a greater range than any of those of the Japanese Navy near Hong Kong at the time of the invasion [54].
Whatever their effectiveness in purely military terms, the Hong Kong minefields cost many civilian lives.
References
Notices To Mariners (NTM) were published in the Hong Kong Government Gazette or its Supplement and can be viewed at https://sunzi.lib.hku.hk/hkgro/browse.jsp. The NTM dates given below are the publication dates of the relevant Gazette or Supplement.
All Hong Kong newspapers were viewed via the Hong Kong Public Libraries, Multimedia Information System (MMIS) website, https://mmis.hkpl.gov.hk/home
- 1. Phillip Cracknell, Battle for Hong Kong 1941, (2021), Page 79
- 2. Phillip Cracknell, Battle for Hong Kong 1941, (2021), Page 79
- 3. Notice to Mariners (NTM) 185/1939, 21-10-1939
- 4. NTM 11/1941, 24-1-1941
- 5. China Mail, Page 1, 31-10-1939 & Page 6, 1-11-1939; HK Daily Press, Page 1, 1-11-1939; HK Telegraph (Final Edition), Page 1, 1-11-1939
- 6. Supplementary NTM 185/1939, 10-11-1939
- 7. NTM 146/1940, 28-6-1940 (closed); NTM 171/1940, 9-8-1940 (reopened)
- 8. HK Daily Press, Page 1, 13-4-1940; HK Telegraph, Page 9, 13-4-1940
- 9. HK Daily Press, Page 5, 2-10-1940
- 10. NTM 265/39, 22-12-1939
- 11. HK Daily Press, Page 1, 22-5-1940
- 12. NTM 154/1940, 5-7-1940
- 13. Admiralty doc. ref. ADM 199/1488, cited at www.indicatorloops.com/hongkong.htm . Note, I have been unable to find a village named Long Kau Tang in the vicinity of the NLM or to find a newspaper report of the sinking.
- 14. HK Daily Press, Page 1, 2-7-1941
- 15. NTM 185/1939, 21-10-1939
- 16. Navigation Order, Government Gazette No. 741/1939, 3-9-1939
- 17. HK Daily Press, Page 12, 16-3-1940
- 18. HK Daily Press, Page 5, 28-12-1939
- 19. HK Telegraph, Page 9, 4-3-1940; HK Daily Press, Page 1, 4-3-1940
- 20. HK Daily Press, Page 12, 16-3-1940
- 21. HK Telegraph (Second Edition), Page 1, 26-3-1940
- 22. HK Telegraph (Second Edition), Page 1, 31-5-1940
- 23. HK Daily Press, Page 12, 23-6-1941
- 24. For example, China Mail, Page 3, 5-6-1940; Page 3, 29-7-1940; (Second Edition), Page 2, 1-10-1940
- 25. HK Telegraph (Second Edition), Page 1, 10-7-1941. Early reports suggested over 100 deaths and 30 vessels destroyed, but these figures were later revised downwards.
- 26. NTM 23, 24 & 25/1940, 26-1-1940
- 27. NTM 24/1940, 26-1-1940
- 28. Phillip Cracknell, Battle for Hong Kong 1941, (2021), Page 79
- 29. The home page is http://indicatorloops.com . The page for Hong Kong is http://indicatorloops.com/hongkong.htm .
- 30. (a). http://indicatorloops.com/loopworks.htm , (b). www.submerged.co.uk/UB116/ , and (c). http://scapaflowwrecks.com/wrecks/other/ub116.php . From these commentaries it appears certain that “controlled mines” destroyed UB 116, but I am unclear if the decision to detonate the mines was taken solely as a result of information on UB 116’s position received from “guard” or “indicator loops” or if human observation or other devices also played a part.
- 31. China Mail, Page 17, 13-9-1937
- 32. Australian Daily Telegraph, 3-10-2016
- 33. NTM 25/1940, 26-1-1940
- 34. China Mail, Page 16, 24-7-1940
- 35. NTM 119/1939, 24-8-1939
- 36. NTM 136/1939, 8-9-1939
- 37. http://www.hongkongwardiary.com/searchgarrison/rnandraf.html#_Toc113344…
- 38. https://www.uboat.net/allies/warships/class/372.html
- 39. https://www.uboat.net/allies/warships/class/378.html
- 40. Phillip Cracknell, Battle for Hong Kong December 1941, (2021), Page 181.
- 41. NTM 232/1939, 24-11-1939
- 42. Phillip Cracknell, Battle for Hong Kong 1941, (2021), Page 79
- 43. NTM 232/1939, 24-11-1939
- 44. NTM 225/1939, 24-11-1939
- 45. NTM 123/1940, 31-5-1940
- 46. NTM 269/1939, 29-12-1939
- 47. NTM 141/1940, 28-6-1940; NTM 275/1941, 21-11-1941
- 48. NTM 294/1941, 5-12-1941
- 49. Endacott G.B., Hong Kong Eclipse, (1978), Pages 86 & 87
- 50. http://indicatorloops.com/hongkong.htm
- 51. Phillip Cracknell, Battle for Hong Kong December 1941, (2021), Page 181
- 52. http://indicatorloops.com/hongkong.htm
- 53. Diary of Major John Monro, MC, RA, dated 19th December 1941, viewed at https://gwulo.com/node/56912
- 54. Phillip Cracknell, Battle for Hong Kong December 1941, (2021), Page 78
Thanks to gw for sharing his research with us. Originally from the UK, gw called Hong Kong home for over thirty years. Having relocated to Australia five years ago, he still misses hiking the beautiful Hong Kong countryside and coastline in search of a historical ruin or a viewpoint from where a photo was taken years before.
Very interesting. Thank you…
Very interesting. Thank you.
The 308thBG B-24s carried out several mine laying operations in the area between Lantau and Hong Kong Island. These may have contributed to losses post-war.
Mount Davis Port War Signal Station
Hi gw,
Thank you for such a detailed coverage of the old-time naval minefields. I've got the information from Philip Cracknell's post in his 'Battle for Hong Kong' blog. Here is the link for your reference. You can see him mention it halfway through the page.
http://battleforhongkong.blogspot.com/2016/09/mount-davis-walk-among-ruins.html
Freddie
Mount Davis Port War Signal Station
Thanks Freddie...and Phillip,
The building Phillip mentioned is the same as the one in my post, and if he says it was the Signal Station, that's good enough for me. I relied on his book for a number of references in my post.
The ELM was not augmented by…
The ELM was not augmented by an Anti-Submarine Boom (ASB), unlike the TCM. Detection of a submerged enemy submarine attempting to enter Victoria Harbour via the East Lamma Channel was therefore heavily reliant upon the “indicator” and “guard loops”. I can’t explain why an ASB was considered necessary to compliment the TCM, but not the ELM – ideas anyone?
Just a guess: Could the waters of the ELM been substantially shallower, meaning that a submarine trying to pass through would have definitely been detected and/or set-off a mine, whereas waters of TCM were deeper and had more of a chance a sub could pass through so the ASB was needed to augment the mines & detection gear?
I used to know a lot about the Harbour Defenses of San Francisco, and know that especially by the WW-II era, they used an integrated approach --mines, steel netting across the entrance to San Francisco Harbor, magnetic loops, search lights, patrol boats, etc.
Position of Anti-Submarine Boom
Hi Tim,
Thanks for your suggestion regarding the relevant depths of the Tathong and East Lamma Channels. You may well be correct.
The 1945 map at www.hkmaps.hk/map.html?1945 shows water depths in fathoms (1 fathom = 1.83 metres) as follows.
- Tathong Channel is mostly between 6 to 10 fathoms (11 to 18.3 metres) deep. It leads to the narrower but deeper Lei U Mun Passage (over 10 fathoms, 18.3 metres deep), which in turn leads into the eastern end of Victoria Harbour (mainly 6 to 10 fathoms, 11 to 18.3 metres deep). Only at a narrow bar off North Point does the seabed rise to between 3 and 6 fathoms (5.5 to 11 metres) deep right across the Harbour.
- East Lamma Channel is deeper than Tathong Channel, being mainly in excess of 10 fathoms (18.3 metres) deep, except for a small area known as "Lamma Patch" (between Waterfall Bay and Pak Kok) which is only 5 1/4 fathoms (9.6 metres) deep. East Lamma Channel leads to the western end of Victoria Harbour which is an extensive, shallower area, mainly 3 to 6 fathoms (5.5 to 11 metres) deep, with an even shallower bank of less than 3 fathoms (5.5 metres) just to the north-east of Green Island.
To summarize, although East Lamma Channel is deeper than Tathong Channel, it leads into the west end of Victoria Harbour, which is generally much shallower than its east end accessed via Tathong Channel.
Submerged midget, or mini, submarines posed the greatest risk of the enemy infiltrating Victoria Harbour undetected. They were so used in the attacks on Pearl Harbour in 1941 and Sydney Harbour in 1942, albeit with mixed results. At the time the Hong Kong defence planners considered their options, I wonder what they considered to be the minimum water depth in which a mini-sub could operate with a reasonable chance of being undetected?
Being battery powered, and recirculating air within the cabin, Japanese midget subs did not release a trail of air bubbles. Thus, when fully (including the periscope) submerged, they were difficult to spot with the naked eye from the surface, especially at night. However, when fully submerged, periscope down, the sub-mariners were "blind" to whatever was outside, navigating by "dead reckoning" based on speed, time and direction whilst taking tidal currents into account. This would be particularly risky in shallow, narrow and unfamiliar waters, as the approaches to Victoria Harbour would have been to Japanese sub-mariners. More accurate navigation could be achieved by raising the periscope above the sea surface to observe the surroundings, but brought with it the risk of the periscope, or white water washing around it, being spotted by surface observers.
To minimize the risk of detection, a mini-sub would remain fully submerged, periscope down, for as long as possible, navigating by "dead reckoning", and only using the periscope as infrequently as possible;
- To check the accuracy of its position calculated by "dead reckoning".
- When attempting to pass through a controlled minefield or anti-submarine boom. The periscope could be used to identify a suitable surface ship about to pass through in the same direction. The mini-sub could then follow closely in its wake or below it, hoping that loop and hydrophone monitors would be unable to distinguish it from the ship being followed.
- To aim at a target prior to firing a torpedo.
Japanese midget subs were approximately 3.5 metres tall from the bottom of the hull to the top of the conning tower, excluding the periscope (which I presume was retractable). However, in congested, well-lit and clear waters, such as the approaches to Victoria Harbour in those days, a fully submerged, periscope down, "blind" navigating, mini-sub could not cruise along just below the surface without a high risk of colliding with surface vessels or being seen from them. Avoiding collisions would necessitate cruising at sufficient depth for the mini-sub to pass under surface ships. Additionally, it was necessary to leave sufficient space below the mini-sub to avoid bumping into the undulating seabed.
Could the fact that the defence planners placed an anti-submarine boom across the eastern approaches where the water is mostly deeper than 11 metres, but not the west where large areas are less than 11 metres, mean that they believed a mini-sub stood little chance of operating undetected in less than 11 metres of water?
If so, it was a risky decision. The possibility of a mini-sub successfully negotiating the East Lamma Channel undetected, then taking its chances in the shallows of the western harbour in the hope of bagging a capital ship may sound suicidal, but that alone would not rule it out of Japanese military planning as later events elsewhere would confirm.
Regarding your second point, yes, totally agree. The maritime defence adopted an integrated approach. Primary responsibility for the minefields and loops fell to the HKRNVR, who also conducted maritime patrols. So did the regular Royal Navy and Marine Police who both would have been on the alert for enemy ships and submarines. Royal Navy and Royal Artillery gunnery could be used if an enemy vessel was detected. There may also have been some form of hydrophone capability, but I have been unable to confirm.