Year completed is: Approximate
Condition at last visit: Ruin
Date of last visit: Dec-1997
Ref: ROB-00175
Other: Guns removed 1917. This is a different Bty to the original Lye Mun Reverse Bty.
Introduction
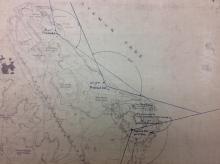
Documents dated 1912 refer to Proposed Anti Torpedo Boat batteries at Lye Mun. They were to cover the water between Lye Mun and the Devils Peak peninsular. The Military authorities were concerned that Torpedo Boats operating at high speeds could enter the main harbour through the gap, without being effectively engaged by the 6” guns at Pak Sha Wan Bty. The proposal was for two new batteries, one with two 4.7” Quick Firing (QF) guns in the west, the other of two 12Pdr QF guns in the east. The QF guns gave a higher rate of fire than possible with the 6” BL guns, to counter the Torpedo Boat speed.
Instead of building a new position for the 4.7” guns, the existing but abandoned Lye Mun West Bty, was rebuilt to suit the new guns. They remained there until early 1941, when they were moved to new positions at Belchers Lower Bty on the western end of HK Island, where they were destroyed by enemy action in December.
There is little written history of the 12Pdr QF Bty. What is known is that the Army loaned the guns to the Navy to arm merchant ships in 1917, and the same year there was a request for barbed wire for the Bty surrounds, but nothing beyond that. The Armament List of 1921, which shows all batteries and guns available for the defence of HK, does not include this Bty.
Visiting the area in 1997 I came across a very overgrown battery which was unknown to me. It wasn’t until several years later, on a visit to the National Archives in London, that I found the documentation mentioning it. Its name was suitably vague: Lye Mun Pass near Reverse Battery. I have referred to it as Lye Mun Reverse 12Pdr QF Bty to separate it from Reverse Bty, which had been abandoned some years earlier.
Timeline
- 1912: A proposed plan for 2 x 12 pdr QF guns near Reverse Bty. (WO 78/5352).
- 1915: Two new Btys for 2 x 12 pdr and 2 x 4.7" are being constructed to the West of Pak Sha Wan Bty. (WO 32/5316).
- 1917: Described as "Lyemun Pass near Reverse Bty": guns on loan to Navy for arming Merchant Vessels. (CAB 11/58).
- 1917: The two 12 pdr QF guns at Lyemun Pass (near Reverse Bty) lent to the Navy for arming Merchant Ships. (WO 78/5354).
- 1917: Refers to the 12 pdr Bty requirements for wire entanglements. (WO 32/5316).
- 1921: Not listed. (CAB 11/58).
- 1997: Ruins noted on personal visit.
- 2014: Restricted area of Museum of Coastal Defence, condition unknown.
For a background to these notes, and a glossary of terms used, please see: https://gwulo.com/node/24630
Photos that show this Place
Comments
Reverse Battery
Hi Rob,
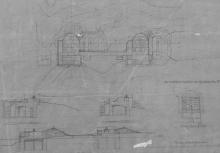
We stumbled upon the site well over ten years ago without any idea of its purpose back then. Thanks to the battery plan you posted, everything has finally come to light.
There are two gun emplacements—referred to here as the west and east guns for easy identification—separated by a long central shelter.
First is the East gun position, featuring its own gun platform and an underground magazine bunker.
Accessible by stairs, the gun platform has three ammunition recesses built into its sides, matching the plan drawing.
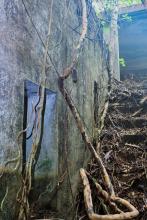
Stairs lead down toward the underground magazine bunker. There are two openings on the outer wall adjacent to the entrance: one is the service hatch, while the other is likely the outlet of the drainage gallery, which is built into the gap between the inner magazine wall and the outer structural wall.
Inside is a two-room chamber with vaulted ceilings. The outer room has tiers of narrow stone ledges built into both walls, features that are absent in the inner room. The two spaces are now connected by an open entrance, leaving it unclear if they originally functioned separately as a shell store and a cartridge store. However, these stone ledges were likely meant to support shelves, keeping the cartridge cases safely off the floor.
Update: The magazine floor plan in the drawing already indicates the space is divided into a cartridge store and a shell store, with the room facing the entrance designated as the shell store.
A single service hatch was found in the inner room of the bunker.
Getting back to the surface. Following the path outside the shelter leads to the west gun position. A long stretch of blast wall is visible directly behind the shelter building.
Reaching the west end of the shelter building.
The west gun emplacement came into view.
The upper staging area and gun platform sit directly above the underground bunker.
The upper gun platform with its ammunition recesses.
View from the bottom of the stairs of the underground magazine bunker.
Interior showing the same room and design layout as the east bunker.
We went up to the gun platform hoping to find the original bolt circle of the mounting ring. However, dense overgrowth made our search unsuccessful. Thus, whether the battery was ever operational remains a mystery.
Lastly, we spotted an Observation Post ruin on the hillside just above the battery. A sizable shell hole is visible on its side wall, suggesting that it was targeted and hit during the war. (Photo courtesy of derekcylo)
12 pdr QF gun
Serving as a visual reference for the gun intended for this battery, the picture shows a replica 12-pounder QF gun on display at the Anti-Motor Torpedo Boat (AMTB) emplacement at Fort Siloso, Singapore. Further details of the gun and the types of ammunition used can be viewed on this website.